WordPress blog

WordPress performance optimization. The ultimate guide in 2025
📌 This guide is still a solid starting point, but we’ve since published a newer, more detailed walkthrough with the latest WoodMart performance options: WordPress performance optimization: a step-by-step WoodMart guide.
Step 1. Install the theme and fill it with your content
Step 2. Check your server response time and optimizations
Step 3. Configure theme performance settings
Step 5. Install WP Rocket cache plugin
Introduction
Website performance is one of the key factors for Google rankings starting from 2021. We get a number of messages from our clients every day asking about their WordPress website speed. This article will cover most of the WordPress website aspects that affect the speed and may increase Google Core Web Vitals.
We are always struggling to optimize our themes’ performance in every update. Our WoodMart WordPress theme 6.0 update was mostly dedicated to its performance and as a result, we optimized most of the aspects related to our theme and reduced our CSS and JS on average by 50%. To show you how the WordPress website based on the WoodMart theme can be optimized we created a test website where we tried to optimize everything as far as we can. In this article, we will describe all the steps that we performed to optimize this test case. We will cover basic WordPress optimization questions, image best practices, fonts recommendations, and give some advice about how to troubleshoot slow websites and fix particular Google Page Speed report warnings.

For our testing purposes, we ordered the cheapest hosting plan with 1GB ram and a single-core processor on Cloudways. You can check its pricing here https://www.cloudways.com/en/pricing.php
We installed our WoodMart theme and used its “Decor” version. But the same algorithm can be applied to any of our themes including all Space themes and Basel. Note that we used the “Decor” demo version that comes without Slider Revolution because if you use this plugin on your page it becomes 2-3 times heavier and can’t be optimized for the best speed. More information about the Slider Revolution will be covered further in the article. After all these steps we will get a super-fast website that has a 90+ score on mobile and desktop devices in Google Page Speed.
Step 1.Install the theme and fill it with your content
Firstly, when you install our theme on a fresh WordPress installation you usually import our dummy content as well. Our dummy content is created in order to help you to start working with your website faster and understand how everything is built and configured. But it is not optimized for the best performance since it contains a lot of images, pages, posts and products that you probably will delete soon. That is why you don’t need to measure the performance on this step.
After theme installation, you need to go through your website sections and fill it with real images, products, posts and pages. By doing that, you remove all the obsolete data and make your website usable for your future visitors. Only after this step, you need to care about the website speed. Here is a list of our recommendations for you before creating your pages, posts and uploading the images:
- Check if your website has a valid SSL certificate. It is the basic thing you need to care about in terms of performance and security. If you don’t have the certificate on your website yet, you need to contact your hosting provider for help.
- Optimize all the images before uploading and use the right image size. (Step 3)
- Make sure that you replace all the images from our dummy content with your own. Some of them might be loaded from our server and slow down your website.
- Don’t create bloated pages with tons of different sliders, animations, carousels and products. Note that every element on the page increases its complexity and DOM size. That would lead to further problems with performance. So keep it as simple and clean as possible.
Step 2.Check your server response time and optimizations
It is very important to have a fast and reliable hosting server for your future website. As our test case is hosted with Cloudways we don’t have any worries about the server response time. This parameter depends on a lot of different factors but with a clean installation and without any plugins, it shouldn’t be more than 0.5s-1.2s (without even cache plugins installed). Here are a few recommendations about how to measure the server response time properly:
1.This parameter may vary from page to page. Usually, we test it on the shopping cart page since it doesn’t have any extra elements and the cache plugin (if enabled) doesn’t affect it.
2.You can run this test using the WebPageTest service https://www.webpagetest.org/ Your server response time will be the first request in the “Waterfall”

3.We also use Google Chrome inspector for this. Click on the right mouse button somewhere on your page and open the “Inspector” (Ctrl+Shift+I). Then switch to the “Network” tab and reload the page. Filter the results by “Doc” and check the response time as shown on the screenshot

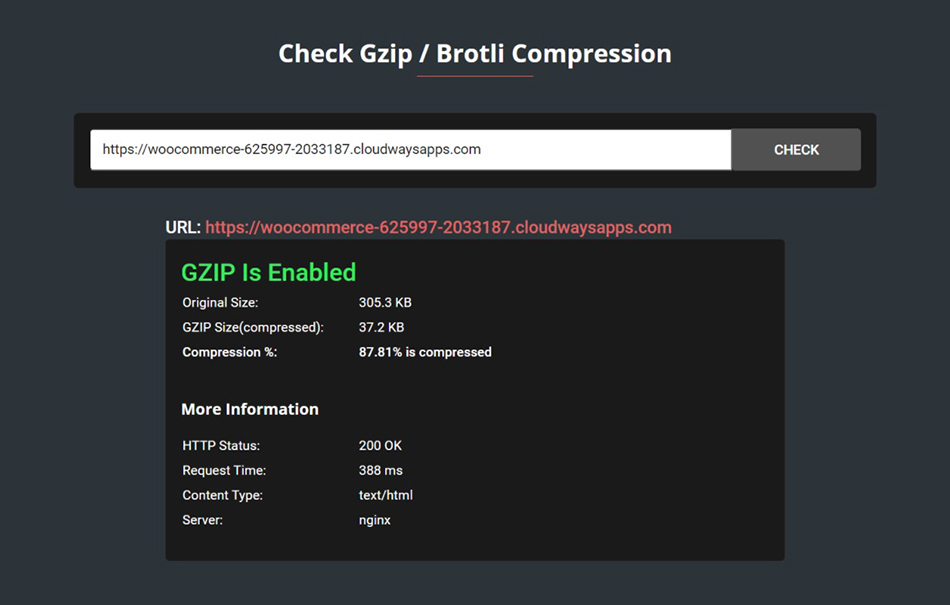
It is necessary to have GZIP compression activated on your server to optimize the resources’ loading size and time. It is enabled by default in Cloudways. If it is not enabled on your server, then you need to contact your hosting provider for help. Check if works correctly using the following service https://www.giftofspeed.com/gzip-test/
Step 3.Configure theme performance settings
Our theme by default is configured to have a good performance and support most of the functions. But if you don’t use some functionality you can disable them and get even better performance. Here is a list of options that you might want to configure right after the installation:
1.Theme Settings -> Performance -> CSS -> Disable Gutenberg styles. Since in most cases you use Elementor or WPBakery page builder, it would be better to disable all Gutenberg CSS and JS files completely.
2.Theme Settings -> Performance -> Fonts & Icons -> “font-display” for Google fonts and icons. We recommend setting the “Swap” value there for better performance. Read more information about all the available options here https://developers.google.com/web/updates/2016/02/font-display
3.Theme Settings -> Performance -> Lazy loading. We don’t always enable this option but it can reduce the page size if you display a lot of different images on your pages.
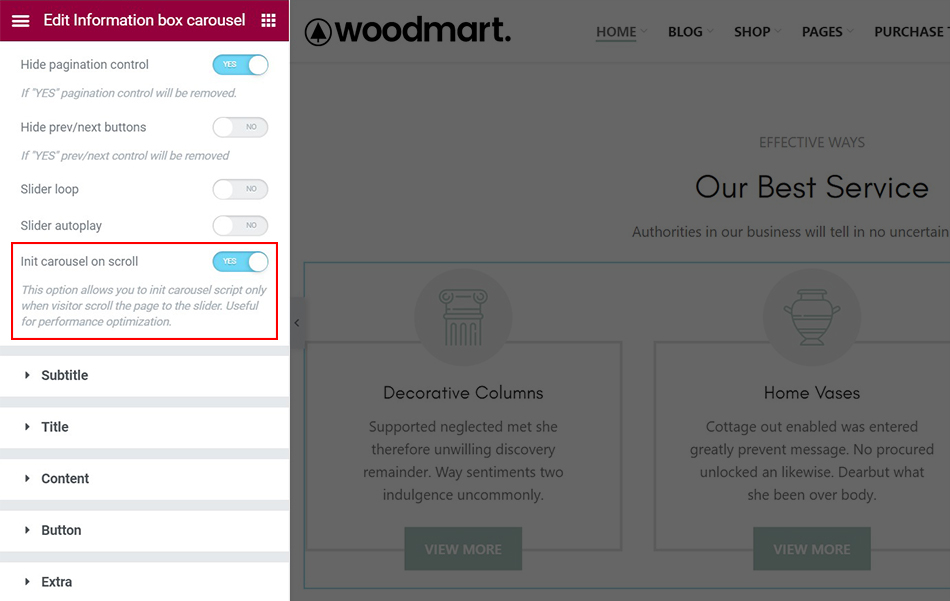
4.Init carousel on scroll. This option is very useful for all carousel elements on the page that are not on the initial screen. We recommend you walk through all the carousels on your pages and enable this option. It will reduce the initial JS execution time.
6.AJAX menu dropdowns. Enable this option for all dropdowns with HTML blocks via Appearance -> Menus. It is very useful to reduce the DOM size on the initial page load and improve the performance.

All these options can reduce your page size by 10-40% but you need to check everything carefully after enabling/disabling any of the mentioned options.
Step 4.Images optimization
Large, not optimized, and not properly sized images are one of the most popular problems that slow the page down dramatically. Usually, images take 50-80% of the page’s total weight. That is why by optimizing all the images and reducing their number (if possible) you can increase all Core Web Vitals scores.
Image weight mostly depends on its size in pixels. But it shouldn’t exceed 100-200KB for any image. The average size for product and post image should be up to 50-150KB and only large images for hero sections and sliders can be 150-200KB but not more. You can optimize all the images before uploading using popular services like https://tinypng.com/
Just upload your image there and download the optimized one. If you don’t want to do this manually you can install an automatic image optimization plugin. We recommend our Image Optimizer as the best choice for this task. https://xtemos.com/image-optimizer/
Our plugin also creates a WEBP format for your images that reduces their weight by 20-40% more. Our theme supports the WEBP format so we recommend enabling it for your website.
Now, when you have optimized and uploaded the image you need to take care of its size on the page. For example, if you have a website container size of 1200px and 6 columns of products then your product thumbnail size shouldn’t exceed ~200 pixels. The image size can be set in different places for particular sections of your website:
1.For products on the shop page via Dashboard -> Appearance -> Customize -> WooCommerce -> Product images

2.For blog posts Dashboard -> Settings -> Media

3.For particular elements on the page (banner, infobox, gallery, etc.) you can set image size while editing this element with the page builder (WPBakery or Elementor)

Step 5.Install the WP Rocket cache plugin
Cache plugins are vital for any WordPress website since they reduce the server response time and make your pages load almost instantly. We usually use WP Rocket as the most advanced and easy-to-use plugin for cache and performance optimization. Besides caching, it also optimizes all CSS and JS resources and provides a simple way to activate CDN globally. It is a paid plugin so if you can’t afford it you can try its free alternatives like Autoptimize, W3 Total Cache, or WP Super Cache. By default, Cloudways has its own cache plugins installed so you can keep using it or disable it completely if you prefer installing your own. In this article, we describe WP Rocket options but you can apply the same set for other plugins as well.
After plugin activation, you need to go through its settings and configure them to your needs. We will list important options which need to be enabled with our theme:
1.WP Rocket -> Settings -> File optimization. Enable the CSS minify option. Note that it works with all the CSS files loaded on your website, and not with our theme only. Usually, we don’t use “Optimize CSS delivery” and “Remove unused CSS”. They will increase your Google Page Speed score but they may badly impact on website loading appearance by adding some jump and “flashes of unstyled content”.

2.WP Rocket -> Settings -> File optimization. Enable JS minify and Load JS files deferred options there.

3.Delay JS execution is a good option but also may impact your UX before the user starts moving his mouse to initiate all scripts. We enabled this option for our test case and added the following list of JS files to the exception list to make sure that these parts start working right after the page loading. Starting from WoodMart 7.0 you can enable the “WP Rocket delay JS exclusions” option in Theme Settings -> Performance -> Plugins to populate this list automatically.
4.WP Rocket -> Settings -> Cache -> Separate cache files for mobile devices. Recommended. Activate this option if you use our Mobile DOM optimization option in Theme Settings -> Performance -> Other or create a separate page for mobile devices using an appropriate option for particular pages.
5.WP Rocket -> Settings -> Advanced Rules -> Never cache URLs. Add there your wishlist and compare pages since they shouldn’t be cached. Note that default WooCommerce pages like My account, Cart and Checkout are excluded from the cache by default

That is our demo website configuration. All other options can be activated on your desire. You can play with different combinations to get the best result.
Step 6.Setup CDN
Content Delivery Network (CDN) is a geographically distributed network of web servers that can store your static resources (images, CSS, JS, fonts etc.) and deliver to your visitors around the world faster than from your own server. This technology can increase your website loading in case when you have visits from a lot of different locations. It may reduce the loading time for static resources and also reduce your server load.
If you are going to set up a CDN service on your website we recommend using either KeyCDN or RocketCDN. They are very fast and very easy to set up CDNs that we usually use in our projects.
The setup process is very straightforward. Let’s go through this process step by step for the KeyCDN example.
1.Register an account on KeyCDN website.
2.Go to “Zones” and click on “Add new” button
3.Fill the “Origin URL” with your website root URL as shown on the screenshot.

4.Click on the “Save” button and wait for a few minutes to deploy your network.
5.When the zone is deployed you need to copy its “Zone URL” as shown on the screenshot.

6.Go to WP Rocket Settings -> CDN (or use its alternative) and enable the CDN option. Also, insert your Zone URL into the appropriate field as per screenshot.

7.Save and clear the cache.
8.Verify if the CDN is activated in the source code of your website. Example of working CDN on the screenshot.

How to fix Google Page Speed warnings
Every Google Page Speed report is individual and depends on a lot of different things from site to site. We will cover the most popular warnings that we usually have in our projects with examples of instructions about how to fix them.
Eliminate render-blocking resources
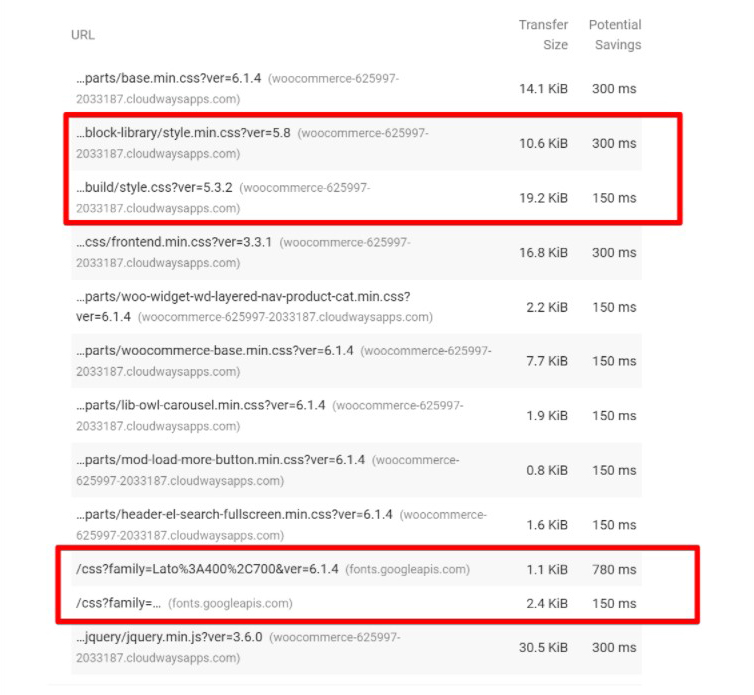
It is the most popular warning that is peculiar to every WordPress website. The more resources you have in the head of your website the bigger your blocking time. Usually, these resources are CSS files, JS, and fonts (Google fonts). So you need to review every single file listed in the report and check if it is really needed on the page. As for theme CSS files, we are always struggling to make them as small as possible. But it is not possible to eliminate them completely. In our test case, we have fixed a few problems on this matter:
- Gutenberg styles. Since we don’t use Gutenberg editor we disable its styles (see Step 2).
- Duplicated Google fonts. Make sure that you have Google fonts loaded from our theme only. In our case we had Google fonts loaded by Elementor too. To disable them you need to edit any page with Elementor, switch to Site Settings -> Global fonts and reset them all.

To reduce the blocking time even more and increase the overall score you can disable Google fonts completely. Or you can download them and load them from your server via Theme Settings -> Typography -> Custom fonts. For our test website, we use one custom font for headings and a “System font stack” for other texts on the page.

Another CSS file loaded most of the time but not always necessary is Font Awesome icons. Note that Elementor loads this CSS file and fonts with icons on any page where you have the icon selected for some of the elements. In our case, we had it in our menu dropdown so we removed the icon elements from there to avoid loading the whole library. Use them only when really necessary. Otherwise, it would be better to upload a single SVG icon.
Reduce unused JavaScript
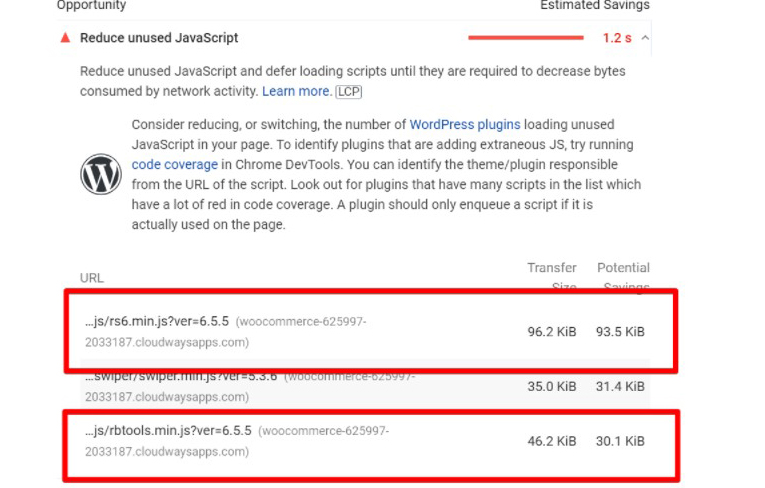
You need to pay attention to this warning and check all the scripts files especially loaded by third-party plugins. In our example, there were two JS files from Slider Revolution that shouldn’t be loaded. If you don’t use the slider at all you can simply uninstall the plugin. If you still need it for some of the pages you need to disable these files from being loaded globally. Go to Slider Revolution -> Globals -> Include libraries globally -> OFF. But in most cases, we recommend you replace it completely with our own WoodMart slider which has a lot of great features to create a functional and light slider. Read more information in our documentation https://xtemos.com/docs/woodmart/woodmart-slider/
Reduce initial server response time

This warning can be easily fixed by installing any cache plugin and in our case, it is WP Rocket. Note that you might see this warning from time to time when you clear the cache in the plugin.
If the server response time is more than 2 seconds without the cache plugin you need to troubleshoot the problem since it shouldn’t be so long. How to check the server response time we explained in Step 1. To find the root of the slow response problem you can perform the following tests:
- Disable all external plugins and measure the time. If it is much faster, then you can enable them one by one to see which of them causes this problem.
- Check how it works with the default WordPress theme to see the difference between it and WoodMart. You need to do the test on the shopping cart page because other pages may have different content. Note that the speed may be different by 10-15% that is normal. But if you see that it is slower 2-3x times then you can contact our support for help.
- If it is slow even without plugins and with the default theme we recommend you consult with your hosting provider since WordPress by itself is very fast and well-optimized.
Conclusion
We have measured Web Core Vitals and general performance stats for base pages of the test website: home page, shop, single product, blog and single post. The results of our optimizations are great and you can see them in the table below.
You can discuss this article in our Facebook Group or on the support forum. We would be glad to hear your feedback and any further recommendations for performance optimization.
 |  |
| Mobile score: 98 Desktop score: 100 Page size: 1.6 MB Gzip compressed: 1.0 MB umber of the HTTP requests: 53 | |
 |  |
| Mobile score: 98 Desktop score: 100 Page size: 1.3 MB Gzip compressed: 783 kB Number of the HTTP requests: 62 | |
 |  |
| Mobile score: 97 Desktop score: 100 Page size: 831 kB Gzip compressed: 292 kB Number of the HTTP requests: 37 | |
 |  |
| Mobile score: 95 Desktop score: 99 Page size: 1.3 MB Gzip compressed: 829 kB Number of the HTTP requests: 32 | |
 |  |
| Mobile score: 95 Desktop score: 100 Page size: 1.5 MB Gzip compressed: 829 kB Number of the HTTP requests: 40 |
Leave a Reply
You must be logged in to post a comment.


19 thoughts on “WordPress performance optimization. The ultimate guide in 2025”
Do you have special support for making these settings on your end?
I also want to suggest which is the best: LiteSpeed & WP Rocket
Hello,
Thank you for your comment. We do not offer special support for making these settings on our end, but you can follow our step-by-step tutorial. If any problems occur, please feel free to contact our support team for assistance.
Regarding your question, both LiteSpeed and WP Rocket are excellent caching plugins. However, based on our experience and feedback from users, WP Rocket is often preferred for its ease of use and robust performance with the WoodMart theme.
Best regards
Hello,
I have a question about Step 2. Configure theme performance settings.
I am using WP Bekary Builder and can’t find the option you describe in 5.Init carousel on scroll.
Can you give me more directions on where that option is or is it included in WP Bekary Builder?
Hello,
Yep, it’s included in the WPB builder, as mentioned above, all carousel elements have it, here is an example: “Information box carousel” – https://monosnap.com/file/SFC5Lr32XrQuKXtbypIaZo6QvIgWwR, “Products carousel” – https://monosnap.com/file/ScpDcCyMiNg5rqV2RnXDLnxnIBpXhn
Kind Regards
There are things that were not mentioned and I got frustrated after activating it
I optimized the site and the indicator is excellent and I followed the optimization guide step by step
But when I run WP Rocket, my sales stop completely
After turning off WP Rocket, customers can buy without any problem
I don’t understand where the problem is. Are there things or js that must be included for Google Ads to work?
I hope that the explanation of these things is clear
Note that I have tried more than 3 times and all of them had the same result for 3 consecutive days
I run WP Rocket, there are no sales
I turn off WP Rocket, sales start again
I hope your experts provide excellent support regarding this matter
I hope you review the link. See the explanation that addresses the topic of Google Ads and js files
In option No. 3. Optimize files
https://nakib4tech.com/wp-rocket-settings/
Hello,
We recommend you contacting WP Rocket support for help in this situation.
Kind Regards
They do not have any link to solve the problem or send it to them. Note that you are recommending it to all customers. Note that the add-on is recommended by you and you did not mention a single thing regarding the ads and stopping.
There has been no response or topic allocated regarding this matter at all. Please provide a simple explanation for activating LiteSpeed Cache and activating the important things in it. Please.
Hi
Regarding the questions of Shakoor, can you tell us what are the right wp rocket settings to avoid problems in woocommerce with people unable to make orders
thank you
Hello,
If you have any conflicts between WP Rocket and WooCommerce, you need to contact the plugin’s developers for help. If it is somehow related to WoodMart – create a topic on our support forum so we can check.
Kind Regards
How would this be applied in June 2025 ? It doesn’t need an update ?
Hello,
Yes, you still can use tips and recommendations from this article in 2025. We update it from time to time.
Hello,
I would like you to review this guide thoroughly from start to finish and support it with images. Specifically:
That the WP Rocket plugin has been updated, which changed the available settings,
There are no separate settings for mobile,
JS exclusions activated from the theme will not appear as a list in the corresponding WP Rocket section,
I would like these points to be explained in clearer language. Additionally, I hope a comprehensive guide covering all settings can be prepared.
Hello,
Thank you for the comment. We will update the article soon.
Why doesn’t this guide mention CloudFlare? This article is outdated and doesn’t even mention CloudFlare R2 or App4CloudFlare. Please update it to include the performance features cloudflare offers in 2025.
There are various settings in Cloudflare, that can also be set in WP-Rocket and in WoodMart settings. Like minifying js, css, lazy load, etc. Please explain where we should set what.
This guide does not mention LiteSpeed web server and LiteSpeed Cache (which comes with it) Woodmart does not seem to be compatible with LiteSpeed Cache at all. Yet, LiteSpeed web server with LiteSpeed Cache is the fastest solution for WordPress in general. Please consider to add that or to create a new guide for LiteSpeed Web server / LiteSpeed Cache.
What about image optimisation services like Quic.Cloud, CloudFlare Images and Imagify?
What about autoloading?
What about the performance features introduced to Woodmart & Elementor after 2021?
What about different cache methods? memcached, redis, varnish, opcache, browser cache?
Hello,
Thank you very much for your comments. We will update and extend this article soon.
Kind Regards
We really need an updated list for this and as others have said… something for Litespeed cache
Thank you