Home / Forums / WoodMart support forum / How can we make Video appear Full-Width or Screen. Default 404 page and custom
Home › Forums › WoodMart support forum › How can we make Video appear Full-Width or Screen. Default 404 page and custom
How can we make Video appear Full-Width or Screen. Default 404 page and custom
- This topic has 55 replies, 3 voices, and was last updated 4 years, 1 month ago by
 Luke Nielsen.
-
AuthorPosts
-
February 1, 2022 at 4:07 pm #349487
harshweParticipantHello Luke,
9.a. Thank you for sharing that same code again.
9.b. Thanks for clarifying.12. Thanks for sharing additional code
14. Thanks for clarifying further and sharing CSS for mobile also.
For desktop, this below code is not working, when entered in Desktop or Global CSS area. It only updates the right part, that is product summary, but not the images..single-product .website-wrapper .whb-header { margin-bottom: 35px; }Please see below-
https://i2.paste.pics/FUPQ5.png
However, for mobiles, the same code is working when entered in Mobile CSS area.13.
In your case you have a cache plugin that will always cache the product page…
My question is –
i)Your own Demo Decor is using the WP Rocket Plugin, and the Wishlist is working correctly on that also. (And we have set the same rules of Cache plugin when using LS Cache plugin)ii)Also, when we check other users sites (Woodmart’s customers), the Wishlist is correctly working on their site too, even though they are using Cache plugin (including few using LS Cache too)
iii). Also, if one won’t use the Page cache, then what will be the benefit of using Cache plugin. As products are assorted and shown everywhere. The purpose of using cache plugin will get defeated for ecommerce store. Isn’t it.
iv). This is about Shop or Archive page, not alone the Single product page.
With that said, there should be some solution or workaround to make it work on Shop or Archive pages including Single product page.
Can you please suggest the possible solutions or workarounds for this.Regards
-
This reply was modified 4 years, 5 months ago by
harshwe.
February 2, 2022 at 9:50 am #349644
Luke NielsenMemberHello,
14. You are using the “Sticky product” option that has by default the indent from above 150px, it can be changed by adding the below code to the functions.php file in your child theme and specifying the desired value (return “your value”;).
add_filter( 'woodmart_sticky_product_details_offset', function () {
	return 100;
} );
13. On our demo this option has the same work (see below video).
https://gyazo.com/7f43e46e4c4e577cbad6990225db1017
You can try to disable the cache plugin and check how will it work.
Cheers,
Kind RegardsFebruary 2, 2022 at 4:29 pm #349743
harshweParticipantHello Luke,
14. Yes, this worked. Thank you 🙂
13. I saw earlier, it was working on one of your demo (probably from speed optimization guide or some other demo). May be I forgot or incorrectly noticed or mixed with some other.
But I found it working on other customer’s site (using woodmart and Cache plugin)a. In either case, can you please suggest the possible workaround, by having the Cache plugin.
As there should be some sort of solution or workaround to make it work on Shop or Archive pages including Single product page.b. I think Button State of “Adding to Wishlist” action is being stored in cookie. Please correct me If I am wrong.
c. Can you please share the name of the Cookie file that is being used to store the Button State for Wishlist.
I think that may help us, in this case, for sure.Regards
-
This reply was modified 4 years, 5 months ago by
February 3, 2022 at 8:54 am #349829
Luke NielsenMemberHello,
13. Please, send me a site that has this functionality with the cache plugin.
As you can see in the description of the option, it cannot work correctly with the cache plugins so I don’t know any possible workaround, unfortunately.
https://monosnap.com/file/thnsp1TVjL6nKVLf5UQKrf8gUtYhb1
The code with this functionality is situated in the
inc/integrations/woocommerce/modules/wishlist/class-ui.phpfile.In this file itself, find the “
add_to_wishlist_btn” function on line 298.https://gyazo.com/32b0d067e7487f900de9d9cf2998f86e
Let me know if you have any questions, I’d be happy to answer them.
Kind Regards
February 3, 2022 at 11:09 pm #350003
harshweParticipantHello Luke,
13. I will share it, the moment I find that again.
Thank you for sharing additional details.c. Can you please share the name of the Cookie file that is being used or that is responsible to store the Button State for Wishlist.
I think that may help us, in this case,15. We added a Currency Switcher on Top bar (through WOOCS plugin) using Text-HTML Element.
We changed the color using Configure options of Text Element, but that is not reflecting on the frontend site.
a. Can you please check as why it is not reflecting the White color of the content or text for Currency switcher (which we updated and configured in Text-html element)
Should not it is suppose to update straight away through element itself.b. Currently, this is how it appears, and we have shown what we are looking for-
https://i2.paste.pics/FVO1E.png
Please suggest how to update the colors according to screenshot.16. How to change the color of just the Value that shows up at the end of default Woocommerce Alert or notification message, as shown below.
a). Why it is showing in different color and not in same White color. Just like other default woo notification message is showing up, in white color.https://i2.paste.pics/FVO3I.png
PS: We cannot change the overall Golden looking BG color (running in whole Row), as –
b). This is a color which we are looking to keep
c). If we lighten it, then the default woo notification message won’t be visible, due to it being light.
d). If we darken it, then the Text or Value color (shown at end), may not be visible, due to it being bit darker.
Hence, want to change just the color of that conditional Value.
Either using CSS or code snippet.Please suggest
Regards
February 7, 2022 at 10:44 am #350879
Luke NielsenMemberHello,
13c. The Button State for Wishlist comes from the
woodmart/inc/integrations/woocommerce/modules/wishlist/class-cookies-storage.phpfile.15. You should set the color for the
[woocs]itself (or rather find this HTML block and there set the color for the elements).https://monosnap.com/file/jz1JlrZbhH4OcJcEwoGB8FNnbeat9r
If you define the styles In this way (https://monosnap.com/file/t4gC4jopzWne3dFBKXBb60J3SuuGki) the styles will appear for the text. Also, for the values like “orange”, “black” etc. you don’t need to put a “#” sign in front of them.
16. There is another color of the price for the error message because you have set the color for the prices globally, it can be changed via the below custom code.
.woocommerce-error .amount {
    color: #fff !important;
}
Let me know if there is anything else I can help and have a good day!
Kind Regards
February 7, 2022 at 5:30 pm #351130
harshweParticipantHello Luke,
13. c. Thank you for sharing the file URL.
Can you please suggest the actual cookie name alone, which stores the info.
Is this any of the below one-
https://i2.paste.pics/FX67W.png
If not, then can you please suggest only the cookie file name.Is it with underscore, as (_1) or without underscore and the number suffix, that is just woodmart_wishlist_products
In either case, can I ask why browser is showing woodmart_wishlist_products_1 (that is underscore followed by number 1)
15.
But, I have defined this way only, which you suggested, but still not working, for me.. Am I missing something, or doing some wrong way.
Can you please check and update it from your side and then suggest what changes have you made and where.
I will just check those later-n, and adjust the colors according to needs.
I am also looking for Mouse-Hover color (which it is currently showing pink, hence not visible too)16. Can I ask what is the default color that was Set for Price or Value in Woo Warning message (means, if I do not change the Global price color, what color it should be like)
a). I will try this. Can you please share the Selector name for this. So that I can use it in Advance Typography, and can further use other Font attributes, if required (like, font family, Style) and keep price colors, at one place.b). How can we change the background color (for this Value or price alone, so as to distinguish it from others, means rest of message)
17. I wanted to know, What is meant by Accent button, under Theme settings > Colors and Styles
What are ALL the places, where changing the colors will affect the Buttons for Accent Buttons.
What button types and from which Elements, it will change the colors of Accent Buttons.
Will it work for Buttons from areas, that are not from the Woodmart Elements.b). Will it also be able to change the color of Submit button of form (contact form 7)
c). If not, how can we change the color, BG color and mouse-hover of Submit button of the form.
Please suggest the CSS for Form-specific. Means that will affect form with specific ID only (and not for button for All of the forms)
https://i2.paste.pics/FX6IR.png
And that I way, we can set separate different colors for different forms, and can distinguish each of them from the rest.
d). Can that CSS go within the Form itself. That is, under the “Form” tab of each individual form while editing the specific Contact form 7.Regards
-
This reply was modified 4 years, 5 months ago by
February 9, 2022 at 4:16 pm #351755
Luke NielsenMemberHello,
15. It seems that colors for the
[woocs]block come from the “WOOCS” plugin, therefore this issue is not related to our theme. But I’ve created a custom code for fix that. If you know how to change color via the “WOOCS” plugin you can also don’t use this code.Currency text color: .whb-column form.woocommerce-currency-switcher-form .dd-selected { color: #fff; } Currency text color on hover: .whb-column form.woocommerce-currency-switcher-form:hover .dd-selected { color: #000; } Currency text color from the dromdown: .whb-column form.woocommerce-currency-switcher-form:hover .dd-option-text { color: #596876; }https://gyazo.com/4610cfa3d06b6f3a9d0e50330b62f876
16. The default color was white.
a. It will work better if you paste the code to the Custom CSS area.
b. With this custom code you can add a background to the price (see below screenshot).
.woocommerce-error .amount {
    color: #fff !important;
    background-color: #0a0a0a8a;
    padding: 3px;
}
https://gyazo.com/06aeffdd3ffc3331e27005e8c2da0e1f
17. By default, WordPress theme and WooCommerce didn’t have settings for button colors. In our theme, we implement these settings and split all array of WooCommerce, supported plugins, and theme options buttons in three categories to be able to customize them separately:
SHOP BUTTONS. Buttons that are directly related to the WooCommerce purchase functionality. For example:
Add to cart (https://prnt.sc/1mstug0)
Proceed to checkout (https://prnt.sc/1msv4gk)
Return to shop (https://prnt.sc/1mswl7f)ACCENT BUTTONS. Other “Call to action” buttons that not related to WooCommerce shop functionality. For example:
Sign up (https://prnt.sc/1msxyp0)
Post comment (https://prnt.sc/1mszh16)
Accept (Cookies) (https://prnt.sc/1mt08xk)DEFAULT BUTTONS. All other WooCommerce supported plugins and theme options buttons that not included in the two upper categories, and those buttons that do not have own button settings. For example:
Filter (https://prnt.sc/1mt34qf)
View cart (https://prnt.sc/1mt3r1j)
Login (https://prnt.sc/1mt418f)
Update (https://prnt.sc/1mt4lsk)17b. The Contact form button is not one of these three buttons and its settings are more like a button element in a builder. Specifically, this button depends on the classes that were assigned to this button when creating the form. Classes are set like this
[submit class: btn class: btn-color-primary "ASK A QUESTION"](the screenshot of how it looks in the finished form editor https://prnt.sc/26s8i30).There you can use such classes:
btn + btn-color-default– gray button
btn + btn-color-black– black button
btn + btn-color-alt– color secondary button (from Theme settings https://prnt.sc/26s8l07)
btn + btn-color-primary– color primers button (from Theme settings https://prnt.sc/26s8ll7)Similarly, you can make a bordered button only in this case there will be a class
btn-style-borderedinstead ofbtn(e.gbtn-style-bordered + btn-color-primary)Kind Regards
-
This reply was modified 4 years, 5 months ago by Luke Nielsen.
February 9, 2022 at 11:31 pm #351811
harshweParticipantHello Luke,
13.c. This query might have got skipped somehow. Can you please check this again and help me on this.
15. Thank you so much Luke for sharing the code to change colors 🙂
Actually if I try to use the colors from the plugin itself, then it even change some design and layout accordingly (I tried once). Will again try to test the colors from the plugin itself on the Staging site first, if at all I need to use colors directly from that. However, your code will be good for us.
17.
In our theme, we implement these settings
Thanks for clarifying with each type of Button and colors.
Very helpful 🙂17.d). You suggested –
[submit class: btn class: btn-color-primary "ASK A QUESTION"]to be added in the form itself. Does that mean, that in which specific form I will ADD this, it will reflect the Color of Submit button of that form only. And other forms will still show the default Grey color.
If so, then this is what we wanted to have. Thanks 🙂
If not, please suggest.You later suggested to use like this –
btn + btn-color-primary. Does that mean, we should use it like below –
[submit class: btn class: btn + btn-color-primary "ASK A QUESTION"]in the form itself or some other way.
Is this the correct one.
What is the use “+” (plus) symbol here. And what will be the difference between –
btn + btn-color-primaryandbtn-color-primarye) How can we use custom color. Means what Submit Class to use instead of above, to use the Hex value of color.
You suggested for Grey, Black, Primary and Secondary only. What if i want to use #C3EAEF color for Submit button, or any RGB value.
c) And what Class or code will be for Mouse-Hover color for the Submit button, to be used within the same Contact form 7f). You suggested –
we implement these settings and split all array of WooCommerce, supported plugins
Just curious to know, as Contact Form 7 is one of the supported plugin.
So why not any of the available Button color styles not working and not changing the color of Submit button for Contact form 7, Out-of-the-box
Means, why, either of Primary or Secondary or Accent colors styles not works for Contact form 7 buttonsCan you please reply on the posts from these tickets. It’s almost 2 days and 2+ for 1 of these-
https://xtemos.com/forums/topic/few-issues-in-theme-needs-attention-solutions-expected/#post-351161Regards
February 10, 2022 at 2:51 pm #352005
Luke NielsenMemberHello,
13c. We can’t give you a specific file because all the files in the
wp-content/themes/woodmart/inc/integrations/woocommerce/modules/wishlistfolder are interconnected.But I can tell you where the code of the “Save button state after adding to the list” option is situated.
https://gyazo.com/e5815aa32f2ab93ec885e5caa1c8b87b
So please, navigate to
wp-content/themes/woodmart/inc/integrations/woocommerce/modules/wishlist/class-ui.phpfile and find theadd_to_wishlist_btnfunction on the 298 line. This function is responsible for this option.https://gyazo.com/e6365b8ac0e976329fe21f0d67f0e0c5
Also, if you will make some changes, remember that you are doing it at your own risk.
17d. Yes, you right understood.
The “+” symbol I wrote for understanding that you need to use both classes like shown in the below screenshot.
The “btn” class gets the default styles of a button from our theme hence the first class
btnspecifies the type of button and the secondbtn-color-primaryclass changes the color of the button. Also, if you will use only thebtn-color-primaryclass, the button will not work properly.e, c. In this case, will be better to use the custom code.
f. Our theme supports the functionality of the CF7 plugin (in other words is correct work with the theme) but we cannot influent the functionality of the plugin itself.
Kind Regards
February 10, 2022 at 4:59 pm #352051
harshweParticipantHello Luke,
13.c). Please be assured, I never make any changes in the core files. And you could have seen and experienced that from our past communications over tickets too. I never take risks. And I don’t even prefer to make such changes at all. I just wanted to know the file name, which unfortunately I could not get.
Hence, I further tried to explore on my own, and found that the location and file you suggested earlier, might work, in this case, regarding the File name-
woodmart_wishlist_products
https://i2.paste.pics/FYJLY.pngI tried to Exclude this file name in the Cache Plugin, and then checked with Incognito mode and as a Guest User (without Logging-in) too. And surprisingly this worked.
So to get confirmation, I further tried to replicate it. I tried this many a times, by removing this file from the Exclude section and then test. And then by Adding the file back and testing again. And it works, only and whenever I ADD it in the Excludes section. Also, I tried on other devices too (without logging-in), as a Guest Visitor. I even tried this as an Admin user or logged-in user. And it works there also.
PS: Even if at all, this did not work in future, or creates any sort of issues, then I simply need to remove this line of file name from the Exclude section of the plugin. And by no means, interfering with the Core files and coding of the Theme at all.
Means, this approach works. And I think, you and team can try to experiment with this on your Dev site or testing environment. And once confirmed, you can then suggest all of the Woodmart customers to follow the same approach. In order to make it work for Guest users also, and those who are using Full-page Cache Plugins. Just to keep the “Save Button State” working
17. b) OK. So, I will check this for one of the form.
17. d) ii). Now I get your point regarding ” + ” symbol. Thanks for clarifying further 🙂c) e). Until then, can you please suggest the CSS or custom Selector for this-
e) What if i want to use #C3EAEF color for Submit button, or any RGB value, for that same Contact form 7
c) And what Class or code will be for Mouse-Hover color for the Submit button, to be used within the same Contact form 7Regards
February 14, 2022 at 9:02 am #352751
Luke NielsenMemberHello,
c. Please, define the CF7 item on any page and send me a link with the screenshot (in order to know for which form you want to change the button) so then I will prepare a custom CSS code, also with the mouse hover.
e. In this case, you can set any color with the help of the custom code.
Kind Regards
February 14, 2022 at 5:59 pm #352950
harshweParticipantHello Luke,
c) e). We are using same contact form 7 on this below page, as well as each Single product page too (via HTML block as a button)
https://www.vasangini.com/contact-us/
This is the form that we are using – https://i2.paste.pics/FX6IR.pngf). Please suggest about the Custom Selector or Class or CSS code that will work for Mouse-Hover color for the Submit button, to be used within the same Contact form 7. (by not affecting other Contact forms, if at all we use any, on the site)
Can you please answer on queries for the topics having below responses – 352397
and 352627Regards
February 16, 2022 at 10:54 am #353450
Luke NielsenMemberHello,
As you requested, I’ve created a custom CSS code for the button of the CF7. Pate it to the “Global Custom CSS” area in Theme Settings -> Custom CSS.
#wpcf7-f7630-p5288-o1 .wpcf7-submit.btn,
.single-product .wpcf7 .wpcf7-submit.btn {
    background-color: blue;
}

#wpcf7-f7630-p5288-o1 .wpcf7-submit.btn:hover,
.single-product .wpcf7 .wpcf7-submit.btn:hover {
    background-color: orange;
}
https://gyazo.com/847298bc806de109bc573106f0c6930f
https://gyazo.com/47c97447116cf41787dc5859e61b651e
Thank you for your time and honesty.
Kind Regards
-
This reply was modified 4 years, 5 months ago by Luke Nielsen.
February 16, 2022 at 2:49 pm #353543
harshweParticipantHello Luke,
17. c), e). The above CSS works Only for One Single product page. As I mentioned earlier –
We are using same contact form 7 on this below page, as well as each Single product page too (via HTML block as a button)
The HTML Block is – [html_block id="7310"]
And the screenshot, I already shared.f) How can we make it work for each of the Single product page. There should be some way, as originally we created via the one Single HTML Block.
So if CSS could be linked directly to that HTML Block, or probably some other way.g). Also, is there some way to use the Button Class or CSS to be directly entered in the “Form” tab of that same Contact Form 7 itself. So that it will affect and change button colors for ALL areas automatically, for this specific form. (Just like you suggested earlier, to enter the Class in the Form Tab)
Regards
February 17, 2022 at 3:57 pm #354018
Luke NielsenMemberHello,
I updated the above CSS code so now it works on every product page.
https://monosnap.com/file/DGBoBdmtDVuRQDtko1PgPbkX6L1hjF
g) Most likely it can be done with the help of the custom CSS code.
Kind Regards
February 17, 2022 at 5:36 pm #354034
harshweParticipantHello Luke,
Thank you for revising the previous code.
17. c) e). However, the code for Contact Us page got removed (during code-revision by you), by mistake. Can you please share the updated code. So that it works for both the – Single product pages, as well as the Contact Us page.
I mean by combined CSS (that takes less space and characters), prior to revising this code.Also, can you please suggest on below-
https://i2.paste.pics/G2IBE.pngAs per above screenshot, One number is the Contact Us page ID, another one is contact form 7 specific form’s ID.
Similarly, what does 5288 refers here and for which page ID it is for. Wanted to know where this ID came from and linked with.
Also, what does “o1” refers here. And why the use of this suffix after Page ID. Can you please elaborate on this.Regards
February 21, 2022 at 4:01 pm #354869
Luke NielsenMemberHello,
17. There is already combined CSS code and also it should work with the form of the “Contact us” page. Please try to check it.
https://monosnap.com/file/nBjRQ2E2PwrqUhIlxTplPJLMnOp27U
CSS selector for the CF7 forms generates the CF7 itself so we cannot influent it. This whole selector is related to the form from the “Contact Us” page.
https://monosnap.com/file/Vr12EFVUwtTy5ySqKGCpbO22hXxJQQ
Please let us know if there is anything further we can assist you with!
Kind Regards
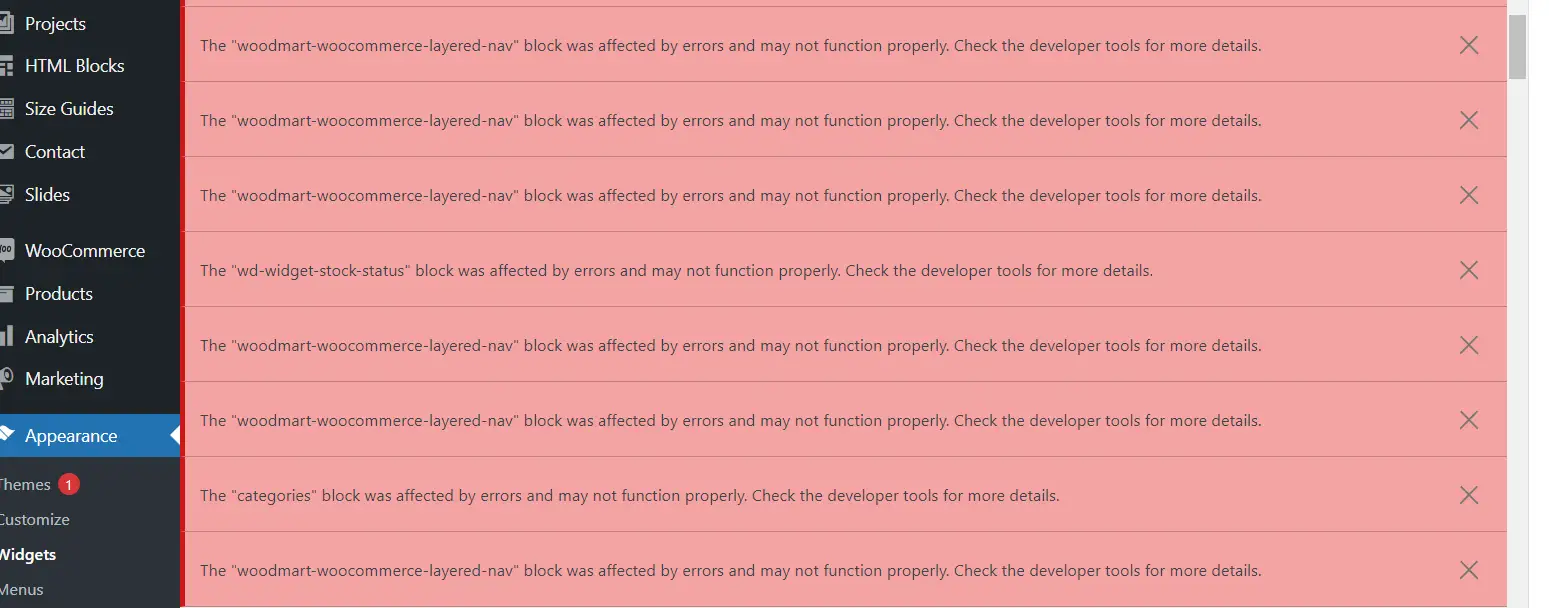
February 25, 2022 at 2:35 pm #356022
harshweParticipantHello Luke,
URGENT:There seems incompatibility issues of theme again with the latest version of WordPress
Our site got Auto-updated to WordPress 5.9.1 (probably due to it being a critical update) couple of days back
And today, when we are viewing Widgets area, it is throwing too many errors
The similar happened in the past also.Here it is – https://i2.paste.pics/G62QQ.png
A kind request–
to please ask the Author and team to keep update the Theme with the latest versions of WordPress and Woo (whenever released), so as to avoid such warnings and critical issues, every now and thenAlso, please ask team to release the fix and upload the updated version on ThemeForest, without letting we customers to wait for actual Next version of update of WMart
Many customers have already put their site to LIVE, and one cannot wait for the next updated version of WMart to be uploaded on TF, in general.Until then, can you please check it. And find out what is causing the issue. Also, can you please fix this on our site, until the New version (with the fixes) be released and uploaded on TF.
17. Yes, I mixed up the Contact Us page ID, with some other ID. The 5288 is Contact’s Page ID itself.
Thanks for clarifying with this Screenshot- https://monosnap.com/file/nBjRQ2E2PwrqUhIlxTplPJLMnOp27URegards
-
This reply was modified 4 years, 5 months ago by
March 2, 2022 at 7:19 am #356814
Luke NielsenMemberHello,
It seems to be a core WordPress problem not related to our theme. Try to install Classic Widgets plugin to fix this problem for now https://wordpress.org/plugins/classic-widgets/
Kind Regards
March 4, 2022 at 10:29 pm #357507
harshweParticipantHello Luke,
Regarding URGENT:
We asked and Author suggested to raise the ticket thereon, due to our testing and below possible reason-We checked and found this does not seems to be an issue caused within the WordPress. Also, WordPress itself gets updated and errors are throwing or coming up with the Woodmart theme activated.
We even tried by switching to one of the Default Theme, and it did not show-up any such errors, in the Widgets section. This is what it shows up in the Widget menu section with one of the Default theme. With No such errors.
https://i2.paste.pics/G7LHM.png
In either case, we think this needs to be fixed. Please suggestPS: A kind request:
Please check this one on our Staging site (or on your own Demo site). If it require to switch to Default theme or anything related. And as I requested here (at then end of post, after 16th point) earlier-
https://xtemos.com/forums/topic/product-price-colors-are-not-reflecting-as-in-adv-typo-n-custom-selector/#post-35750418. a) How to show the Grid swatch attribute to bottom of Text and price in the Shop and Archive pages (including Related products, Up – Cross Sells)
Why so ??
Currently, the swatch is displaying at Top of Title, due to which if there is NO swatch (No variation) for any other product, in the line with product with Grid swatch, then the Title and prices are NOT in the same line for each of these products. Please see how they mis-aligns and do Not looks good at all –
https://i2.paste.pics/G9HYV.pngBelow is what we are looking for. It can be seen how it looks clear and In-Line-
https://i2.paste.pics/G9HXM.png
So if any product do Not have any Grid swatch, then it leaves space at bottom, but atleast the Title and prices are In the same line and maintain uniformity across.b). Can I ask, what is the use of this option and how it affects-
https://i2.paste.pics/G9HY4.png
Can you please suggest with visual differences for ON-OFF state with screenshots.c). Sort of a Glitch (or missed to set correctly)-
On product page, the arrows on Related, Up-Cross sells (product Sliders), are Not exactly in the Center. And they are shifted slightly downwards. As shown here-
https://i2.paste.pics/G9I1I.pngCan I ask, why so.
How to fix this, in order to display them exactly in the center of theRegards
March 11, 2022 at 4:42 pm #360001The issue with widgets will be fixed in the next theme hotfix update which will be released soon. For now to use widgets you can install the classic widgets plugin (https://wordpress.org/plugins/classic-widgets/).
18. a) Try to use the following custom code to move product swatches to the bottom on Quick Shop hover.
.wd-hover-quick.product-grid-item {
	display: flex;
	flex-direction: column;
}

.wd-hover-quick.product-grid-item .swatches-on-grid {
	order: 1;
	margin-bottom: 0;
	margin-top: 3px;
}
18 b). If this option is enabled product attribute name will be shown if a swatch is selected.
Disabled – https://gyazo.com/108e37459cb979b0a5a6d69b48e9cce0
Enabled – https://gyazo.com/be918855a08e13b75a72beae660e157018 c). Arrows are set vertically relative to the entire height of the carousel, including carousel pagination (screenshot https://prnt.sc/CKOqNWMMelwB). You can adjust the position of carousel arrows by following custom code, but in that case product carousel arrows can be misaligned if carousel pagination is disabled.
.slider-type-product .owl-carousel .wd-btn-arrow {
	margin-top: -37px;
}
Kind Regards
March 14, 2022 at 3:53 pm #360715
harshweParticipantHello Bogdan,
The issue with widgets will be fixed in the next theme hotfix update which will be released soon
Thank you for assuring 🙂
18. a) Yes, this worked like a Charm. Much thanks !!
b). Thank you for clarifying. This helped me to understand. Wish if the description or Tip could be Added with some Detail for this option within the Theme settings. As currently, one cannot have a fair idea, on what this option actually does and where.
18. c). OK, got your point.
A suggestion – If the Arrows can be set vertically Centered relative to the Grid height of the carousel alone, that is, by EXCLUDING or not considering the carousel pagination. Then that would appear more logical (my own perception) and centrally aligned.
Why so – So that, whether one Enables or disables the Carousel pagination, the arrows will still looks in the center or appears that way. Please refer below-
https://i2.paste.pics/GD40K.pngIt can be seen, how the Nav arrow looks Visibly centrally-aligned, even when the pagination is set to ON. And, I think NO user shall have any objection regarding this. And if at all, any user, then requires it to be aligned centrally including pagination, then that user can achieve it with the help of Custom CSS, thereafter. Rest, other users can be benefitted with the updated default behaviour (as shown in above screenshot).
Would appreciate, if you could please consider the above request and try to consider this in the future update.
Or else, an ON-OFF button for each Slider (within the Theme settings and relevant Elements), so that user can select according to their needs.Regards
March 22, 2022 at 1:31 pm #363066Hi,
18. c). Our carousel is based on “owl-carousel” library and its navigation styles. From the release of Woodmart theme in 2017, there was no similar issues or feature request regarding the carousel navigation from our clients, so for now we don’t have a plan to change carousel styles in the theme update. In your case, this minor tweak related to carousels can be done via custom CSS code.
You can leave your suggestion in the feature request section and if it will be supported and requested by some part of our customers we may integrate it in the future.
Kind Regards
June 6, 2022 at 6:04 pm #381496
harshweParticipantHello Luke,
The colored Grid swatches displayed correctly earlier (before 6.3 update) at bottom of the Title and price on Shop Archive pages, as per the code shared by Bogdan in the post (point 18.a) – https://xtemos.com/forums/topic/how-can-we-make-video-appear-full-width-or-screen-default-404-page-and-custom/page/2/#post-360001
However, not working now (after 6.3 update), as can be seen from the staging site, here-
https://staging.vasangini.com/shop/
Prev code (working on live site http://www.vasangini.com) –.wd-hover-quick.product-grid-item { display: flex; flex-direction: column; } .wd-hover-quick.product-grid-item .swatches-on-grid { order: 1; margin-bottom: 0; margin-top: 3px; }How to show Grid Swatch attributes correctly after Title and price on Shop Archive pages (including Related products, Up – Cross Sells).
Why it is not working in this version. It seems everything gets affected by this update. Many of the codes and custom css either changes or do not worked.
Can you please check and share the updated or revised code.
Regards
-
This reply was modified 4 years, 1 month ago by
June 7, 2022 at 10:45 am #381587
Luke NielsenMemberHello,
In the latest updates the HTML structure of the product grid was changed so please replace the old code with this one.
.product-grid-item .product-wrapper {
	display: flex;
	flex-direction: column;
}

.product-grid-item .product-wrapper .swatches-on-grid {
	order: 1;
	margin-bottom: 0;
	margin-top: 3px;
}
Keep me informed of any issues.
Kind Regards
-
This reply was modified 4 years, 5 months ago by
-
AuthorPosts
Tagged: Custom-404, default 404 page, full-screen video, how to show full-screen video, replace 404 page, video not full-screen
- You must be logged in to create new topics. Login / Register